Cowrie Honeypot Deployment - Lab Documentation
This document outlines the steps I followed to set up and test the Cowrie SSH/Telnet honeypot on my Ubuntu homelab server. This is a very low-interaction lab designed for log integration and analysis, not for internet-facing deployment. Cowrie simulates an SSH/Telnet service in a controlled environment, allowing defenders to practice log parsing and threat detection without external exposure. The lab can also be configured for HTTP monitoring.
Official Documentation: docs.cowrie.org
2. Environment
System Requirements
3. Installation Steps
3.1 SSH into the Homelab Server
PS. To get the IP address to be a .local address, you can download avahi-daemon..
3.2 Install Dependencies
3.3 Clone the Cowrie Repository
4. Python Virtual Environment Setup
Inside the cowrie directory:
This ensures Cowrie and its Python dependencies run in isolation.
You could also do this in docker, but I like to keep it simple and follow cowrie's documentation.
5. Configuration
Copy the example configuration:
Edit the config:
Ensure listen_endpoints is set correctly:
This configures SSH on port 2222. You can later enable HTTP/Telnet honeypot features as per Cowrie HTTP docs.
6. Start Cowrie
From inside the cowrie directory:
Check status:
7. Testing the Honeypot & Logs
Testing from Another Machine
From your host laptop (or another machine on the network):
Enter any username/password - Cowrie will pretend to accept or reject.
Example of connecting to the honeypot and executing commands:

Figure 2: Active SSH session with the honeypot, demonstrating how attackers interact with the system and how commands are logged for analysis.
Monitoring Logs
Watch the logs on the Cowrie server:
Example output:
Real-time log output from Cowrie honeypot:
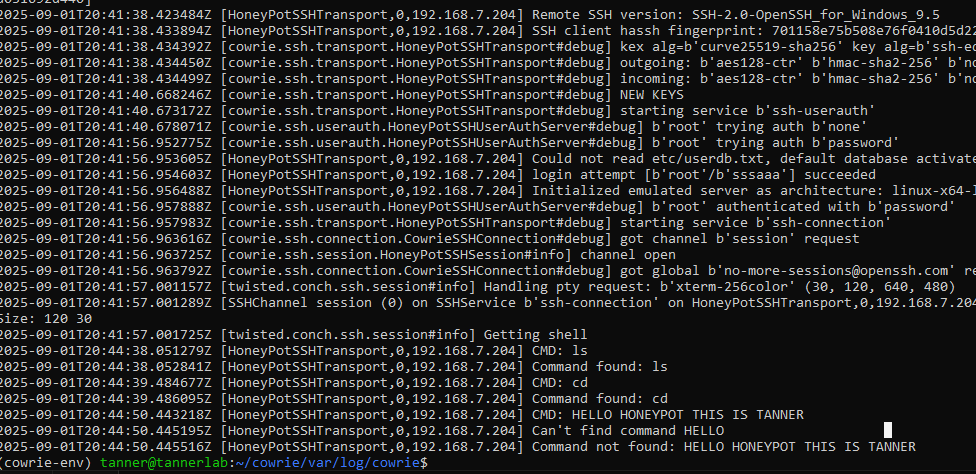
Figure 1: Live terminal output showing SSH connection establishment, authentication attempts, and attacker command execution. The logs capture the complete session including key exchange, authentication success, and commands like ls and cd.
View structured JSON logs (for SIEM integration):
Look at session transcripts (key-by-key logs):
8. Next Steps
- •Parse and analyze logs using Filebeat + ELK or Splunk Forwarder
- •Run some controlled tests (SSH brute-force with bad credentials, run simple commands like ls, cat /etc/passwd)
- •Collect artifacts from var/lib/cowrie/ for your report
9. Screenshots & Visual Examples
Cowrie Honeypot Logs

Figure 1: Real-time logs from Cowrie honeypot showing SSH connection establishment, user authentication attempts, and attacker command execution. The logs capture the complete session including key exchange, authentication success, and commands like ls and cd.
Key Details: SSH client fingerprint, authentication method, PTY requests, and command execution are all logged for analysis and threat intelligence.
Active SSH Session with Honeypot
Figure 2: Live SSH session demonstrating how attackers interact with the honeypot. Shows the connection process, authentication, and command execution in real-time, providing hands-on experience with honeypot interaction and log generation.
Key Details: Interactive session, command execution, and real-time honeypot response demonstration for educational purposes.
This lab write-up is part of my ongoing cybersecurity learning journey.
← Back to All Labs